
How to Panel a Wall: DIY Wall Panels in 7 Simple Steps
There is a British proverb: “Your house is your castle”. This shows that the British value their homes very much, so they also care about their home decoration. But in the minds of the British, there seems to be little concept of decoration, because few families in the UK specially invite decoration teams to decorate their houses.
Considering that the labor force in the UK is very expensive, high-quality decoration team members charge very high fees, so most families do their own decoration. They think that the biggest advantage of self-decoration is that they can fully display their individuality in house decoration.
So DIY home design and decoration became popular in the UK. According to a survey conducted by local media, 1/3 of British residents use DIY methods for home decoration, and 87% of British women admit that they paste all the wall wallpapers in the decoration by themselves.
This kind of “renovation” is more appropriate than “decoration”. There is no need to do extensive remodeling projects for the house, just start with decoration, paint, make furniture, make fireplaces, pave floors, arrange accessories and fabrics, etc.
Revenue of Decorating and Diy Retailers in the United Kingdom (Uk) from 2008 to 2020 (In Million British Pounds)
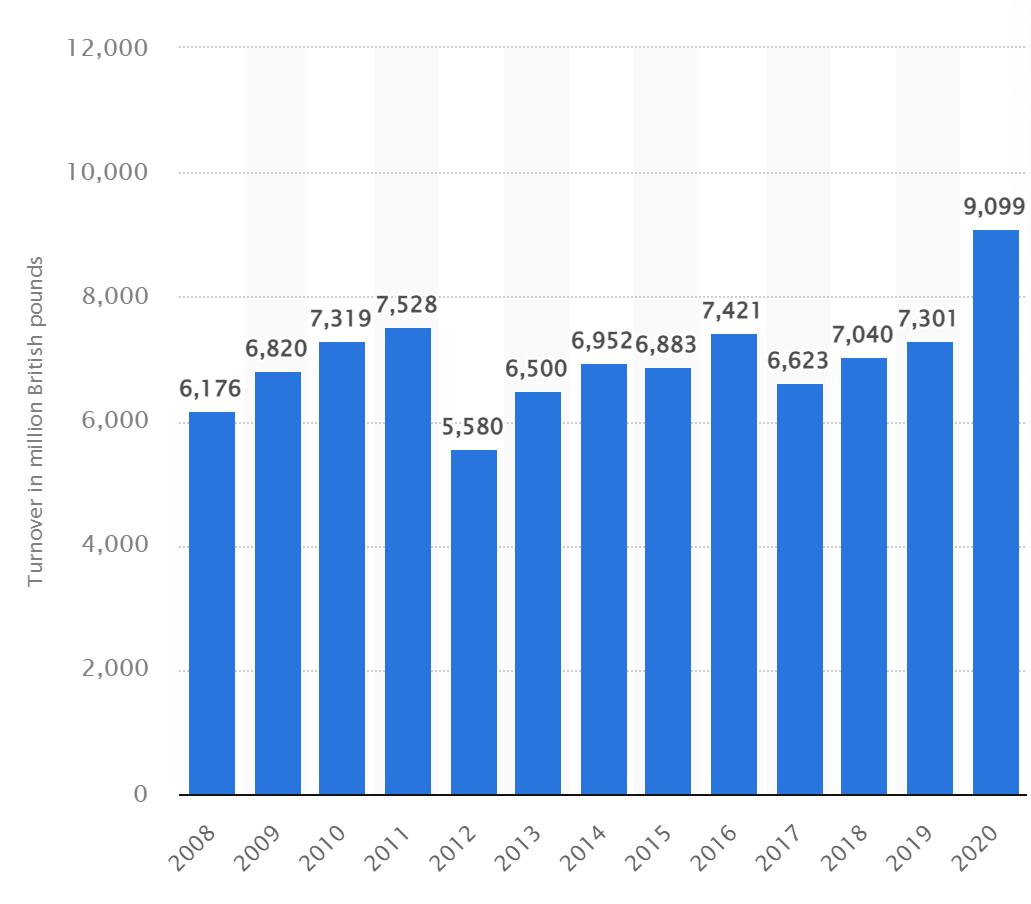
Details: United Kingdom; Office for National Statistics (UK); 2008 to 2020
Source: Statista
From the above data from ![]() , this statistic shows the total annual turnover of retail sales of decorating and DIY supplies in the United Kingdom from 2008 to 2020. Over the time period under consideration, retail sales turnover from DIY supplies fluctuated. In 2020, turnover of retail sales of decorating and DIY supplies reached to approximately 9.1 billion British pounds, marking a significant increase on the previous years.
, this statistic shows the total annual turnover of retail sales of decorating and DIY supplies in the United Kingdom from 2008 to 2020. Over the time period under consideration, retail sales turnover from DIY supplies fluctuated. In 2020, turnover of retail sales of decorating and DIY supplies reached to approximately 9.1 billion British pounds, marking a significant increase on the previous years.
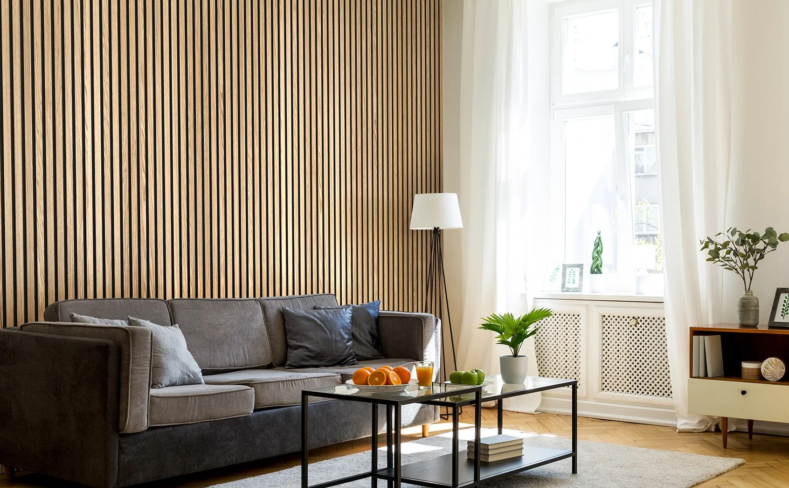
Keen to learn how to panel a wall? Wall panelling has been gaining momentum lately, with Instagram users sharing wall panel makeovers in their homes, especially in hallways, bedrooms, living rooms and bathrooms. According to Google Trends, DIY wall panels have taken over people’s homes and social media as searches for ‘wall panelling DIY’ increased by more than 250%.
Slat wall panels can give any room a bit more depth, and they’ve got that perfect blend of traditional and contemporary style. Not only do panels look great and revive your decor, but they can also help cover up any uneven surfaces or walls that may be in need of filling. Wall panels can come in several different matching designs, so do your research and choosing what you think is the best style that suits your home is very important.
For example, styling includes grand-period designs, tongue and groove, traditional shaker styles, Jacobin-style grids, or wainscoting styles. But if you’ve never done it before, don’t hesitate: with a little know-how, you can make decorative wall panels quickly and easily with great results.
DIY wall panelling is an easy way to add architectural features to your home without a lot of time and cost, and can transform any room in your home by making your walls look more interesting, it’s also a great cost-effective way to give any room a new look. Whether you’re looking to install some modern living room wall panels and shower wall panels, follow our guide on how to DIY wall panelling at home and check out our professional decorating tools to help with your wall panel project.
I. How to panel the walls?
“Paneling adds warmth, depth and character to any space no matter the size,” says celebrity architect and expert Craig Phillips. “It really transforms a room and is totally different from a typical feature wall.” We have already discussed wall panels installation for you in the previous article. The difference this time is that we will introduce you to how to install wall panels by yourself.
Before you start, the essentials you will need include:
– Wall paneling
– No nails glue
– Decorator caulk
– Saw or cutter
– A notebook and pen to jot down sizes
– Sandpaper or electric sander
– Hammer
– Tape measure
– Calculator (We recommend trying this calculator and online visualization tool to measure correctly)
Step 1: Planning
Panelling a wall is an interesting DIY task, but it’s important to plan and prepare the wall first before you get started. As with most DIY jobs, preparation is key to getting the look you want, first get a clear idea of what your panel wall will look like by sketching it out on a notebook. This way, you can stay on track and know how many panels are needed to complete your project.
Instagram is a great place to find inspiration if you’re stuck with ideas. Use the hashtags #diywallpanel and #wallpanelideas to see what other people are doing. We recommend not rushing your panelling. If you can’t decide what style to go for, put off your project until you can decide.
Step 2: Measure the wall
When paneling a wall, you need to measure how many pieces of wall panels you need. Once you’ve determined how much you need, it’s time to measure your walls. This is one of the trickiest parts of paneling, so take your time until you’ve got it spot on.
- Use a tape measure to calculate the full width and height of the wall you are deciding to panel.
- Decide how many wall panels you need. Some people prefer panelling only half the wall, while others prefer a fully-paneled look.
- Remember to consider top and bottom panel framing, as well as vertical and horizontal panels.
Most importantly, make sure to measure the wall accurately. So grab a tape measure and measure at least 3 times to be sure, to make sure your panels are flat and give you a neat finish, write down all your measurements clearly and carefully, down to the last 1mm.
And, be sure to double-check your measurements to make sure it fits like a glove. Measure your wall, then check and measure it again to make sure your measurements are correct and that your wall panels are evenly sized and fits perfectly into the space.
Work out the distance you want between each wall panel and write down these measurements so you don’t forget! Sketching out what you want the panel wall to look like can greatly help you visualize and stay on track as you go through all the steps.
Step 3: Cut the Panel
Now is the time to cut the panels, depending on the size of your wall, or how many panels you want. You can cut the panels yourself or consult a professional (George Panel will cut the panels for free, depending on how many you have). Using a saw and miter box at a 90-degree angle, carefully cut the panels that will be placed horizontally according to the measurements, repeat this process for all vertical panels, and lightly sand the ends until smooth.
Step 4: Sand and smooth the walls
Next, it’s time to sand and smooth down your walls. If you have one on hand, you can use sandpaper or a power sander. Prepare your walls before attaching the panels, by sanding and smoothing them down. This removes any lumps or bumps that might otherwise show through.
While paneling can hide many problems on the surface, there are certain issues you need to address before proceeding with panel installation:
- Get rid of any flaky plaster or peeling paint by sanding down with a gritty sanding block.
- Fill in any holes or gaps by carefully pushing filler in with a filling knife.
- Once you have a smooth surface to work with, it’s time to start installing the panels onto your wall.
Step 5: Apply the panels to your wall
Start by adding a frame. First the bottom plate, then the top. Place the panel on the marked wall and use a laser level to make sure the panel is straight. Apply strong adhesive on the back and apply to the wall – be sure to press hard and allow it to dry.
Continue adding vertical panels first, then horizontal panels. Remember to make sure each panel is securely fastened before moving on to the next panel. No More Nails glue is recommended for attaching the panels to the wall, but for added security and fixation it is recommended to use both nails and adhesive. Use pipe and cable detectors before nailing or drilling into any walls. If you’re not sure it’s safe to nail into a wall, choose a strong adhesive.
Step 6: Fill in any gaps
Found a gap in your paneling? After attaching the panels to the wall, cover them with decorator caulk to patch up any unsightly cracks, gaps or holes. You may need to fill in some on the sides depending on if any gaps appear, don’t worry as you can cover it with paint. Don’t be nervous if some of your panels are a few millimeters short, just fill them with Polyfilla before sanding to create a smooth, seamless join, and when filled, sand them to complete the look.
Step 7: Paint your wall panel
Now it’s time for the fun part! Make sure the adhesive, decorative caulk and filler are completely dry and set before painting. For an Insta-worthy look, opt for a spot-on shade of inky blue, green, or blush pink. Browse some of our favorite home improvement space panelling looks below for inspiration…
Continue adding vertical panels first, then horizontal panels. Remember to make sure each panel is securely fastened before moving on to the next panel. No More Nails glue is recommended for attaching the panels to the wall, but for added security and fixation it is recommended to use both nails and adhesive. Use pipe and cable detectors before nailing or drilling into any walls. If you’re not sure it’s safe to nail into a wall, choose a strong adhesive.
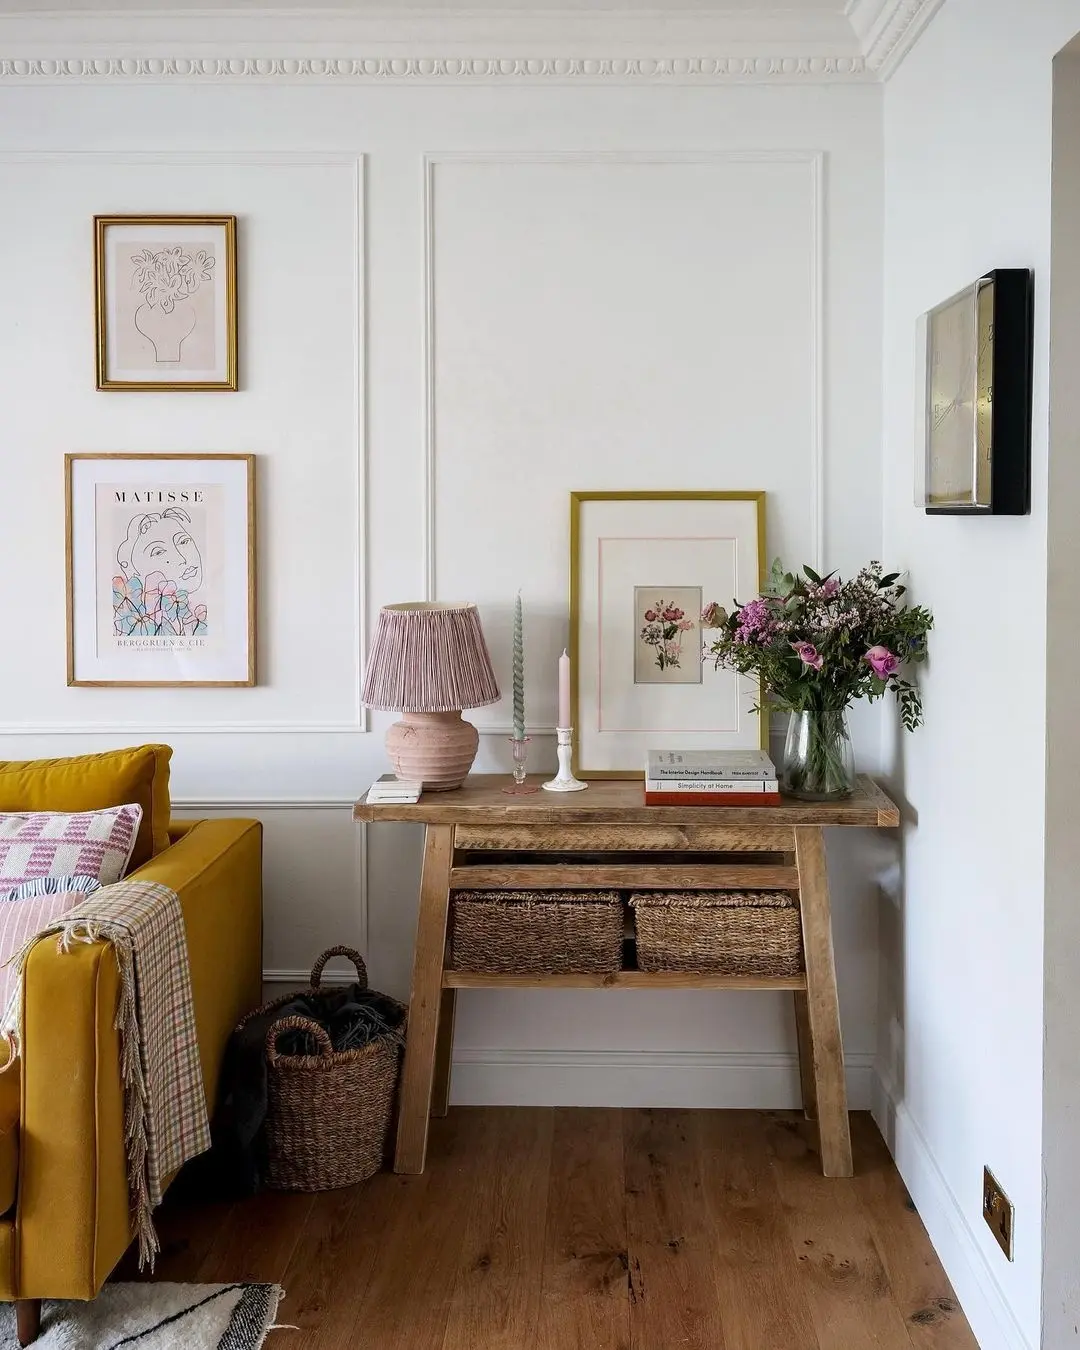

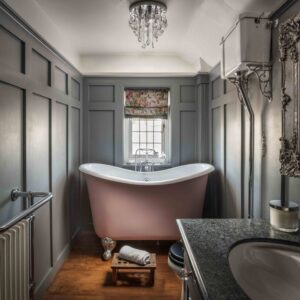
Inspired to add panelling to your walls? We hope this DIY guide has given you the confidence to try it out. Check out this amazing example of wall panelling on a budget for more DIY tips.
II. Conclusion
DIY is a kind of creation, but also a kind of Qingsong mentality. Let us re-experience the meaning contained in DIY, it is not just a kind of creation, but the attachment and dedication to home. There are no taboos, no constraints, and any freedom and imagination can be accommodated in our own space. Even if we are not geniuses, at least we still have the joy of creators.
You can also click on this article to learn about 7 wall panel decoration styles to beautify the walls of your home!
Quick Quotation


